Configuring VIM Enterprise
The configuration of VIM Enterprise involves several different steps, which will vary depending on the components you plan to use. An Azure Storage Account and an SQL database are required for all VIM Enterprise projects. If you are connecting VIM Enterprise to Autodesk Construction Cloud (ACC), you will need to create an Autodesk Platform Services (APS) application.
NOTE: These procedures are typically performed by your IT department.
Configuration Workflow:
Step 1: Create an Azure Storage Account
Step 2: Create an Azure SQL Database or local SQL Server Database
Step 3: Configure ACC (only required if using ACC as the project source)
Step 4: Install Power BI Desktop (download link)
Please read the information in the Getting Started section carefully before you begin configuring VIM Enterprise. It's also a good idea to review the different configuration procedures before you begin so that you are familiar with the steps involved.
Creating an Azure Storage Account
An Azure Storage Account is used because a URL is required to display the 3D geometry data in Microsoft Power BI. The same Storage Account can be used to store the VIM files for all of your VIM Enterprise projects. To configure a VIM Enterprise project, you will need the Blob SAS URL for the Azure Storage Account.
If you do not have access to an Azure Storage account, VIM Enterprise can also be run locally using VIM Ultra to stream the 3D rendered content from a local VIM file to your Power BI report.
To create an Azure Storage Account, you must have access to a Microsoft Azure Resource Group. You must also have sufficient privileges in Azure to create additional resources.
The following Azure resources are required for a Storage Account:
- Storage account service — manages the storage resources
- Storage account firewall — controls who can access to the storage account
- Resource sharing (CORS) — manages access to the stored VIM files
- Container — volume for storing VIM files
- Shared access tokens — defines access restrictions for the storage container
If you are not familiar with Microsoft Azure, contact your IT department for assistance or have them complete this procedure for you.
Creating a Storage Account
- Log in to Microsoft Azure and go to your Resource group Home page.
- On the Resource group page, click Create.

- On the Marketplace page type
Storage accountin the search field and press Enter. - From the search results list, under Storage account, click the Create drop-down and choose Storage account.

- On the Create a storage account page, under Project details, make sure your Resource group is selected in the Resource group field.
- Under Instance details, type a name in the Storage account name field.
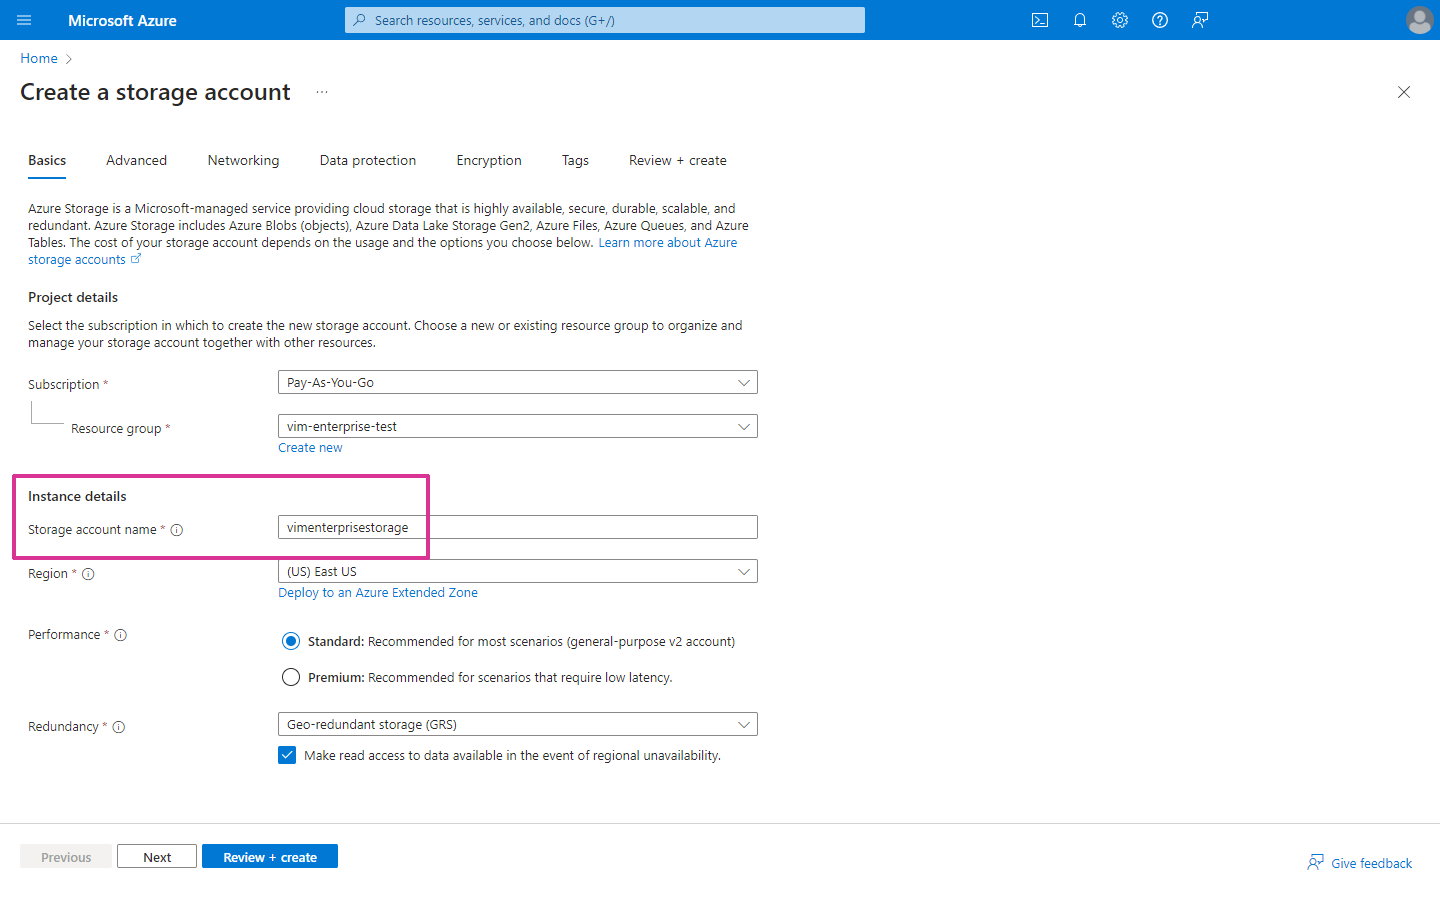
- Review the other settings on the Basics panel and modify them if necessary, based on your own requirements and IT policies.
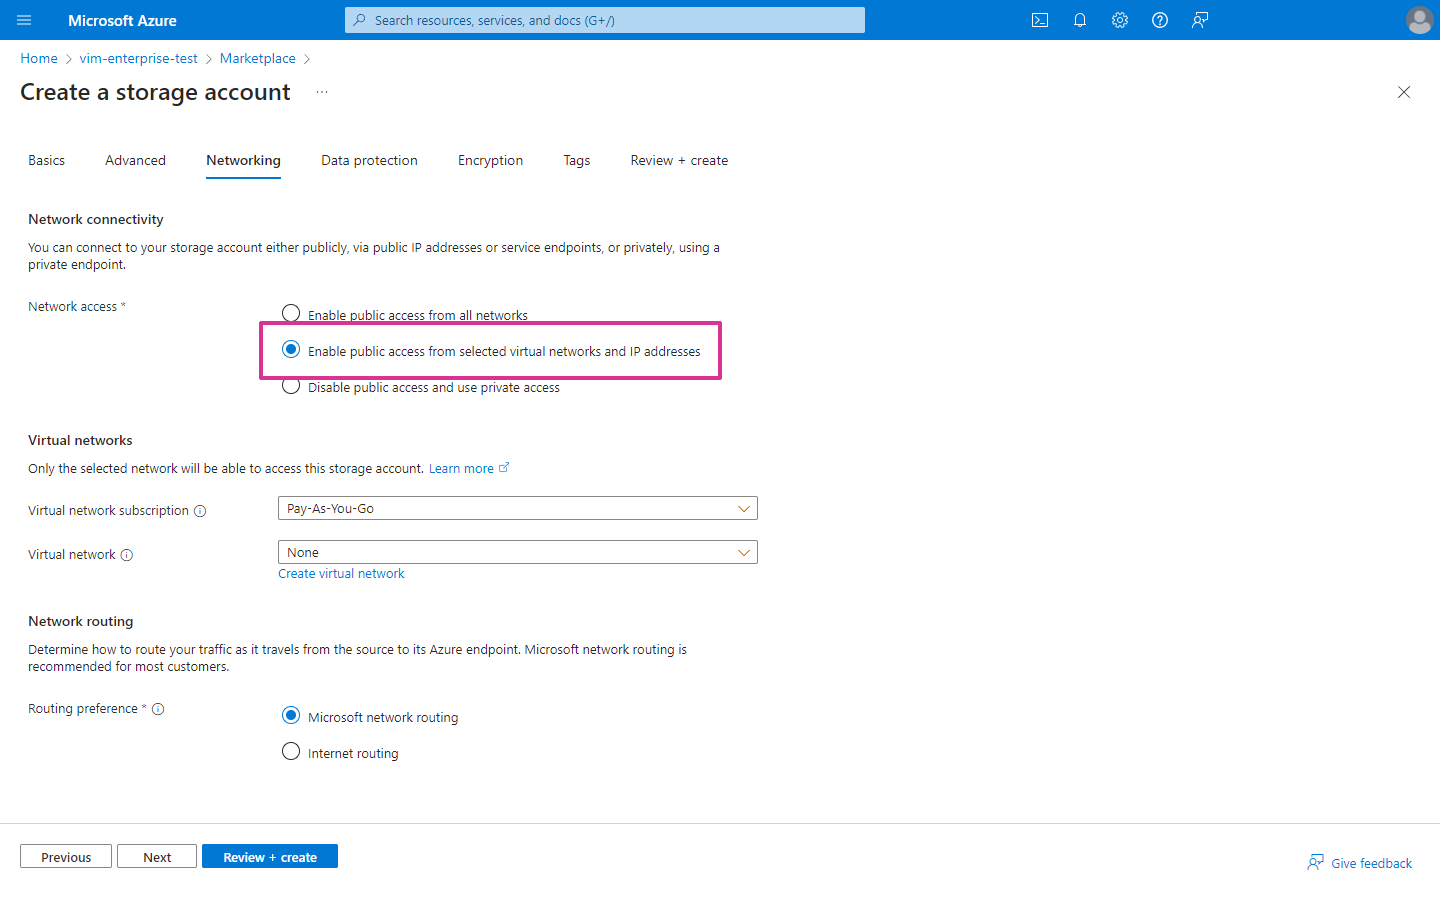
- On the Create a storage account page, click on the Networking tab.
- On the Networking panel, under Network access, select Enable public access from selected virtual networks and IP addresses. Power BI requires access to the VIM files in order to display the 3D geometry data. This setting will control access to the storage account on a per-IP basis, but you might need to modify these settings based on your own requirements and IT policies.
- Click Review + create, review the list of settings, and then click Create. A message saying "Your deployment is complete" will appear when the storage account has been created.
- On the Deployment page, click Go to resource.
Configuring a Storage Account Firewall
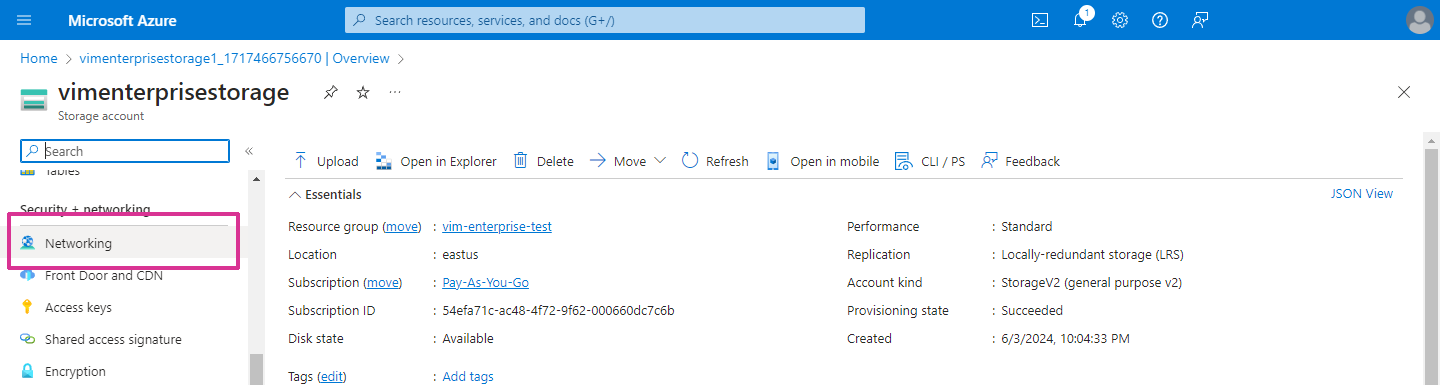
- On the Storage account page, in the left panel under Security + networking, click on Networking.
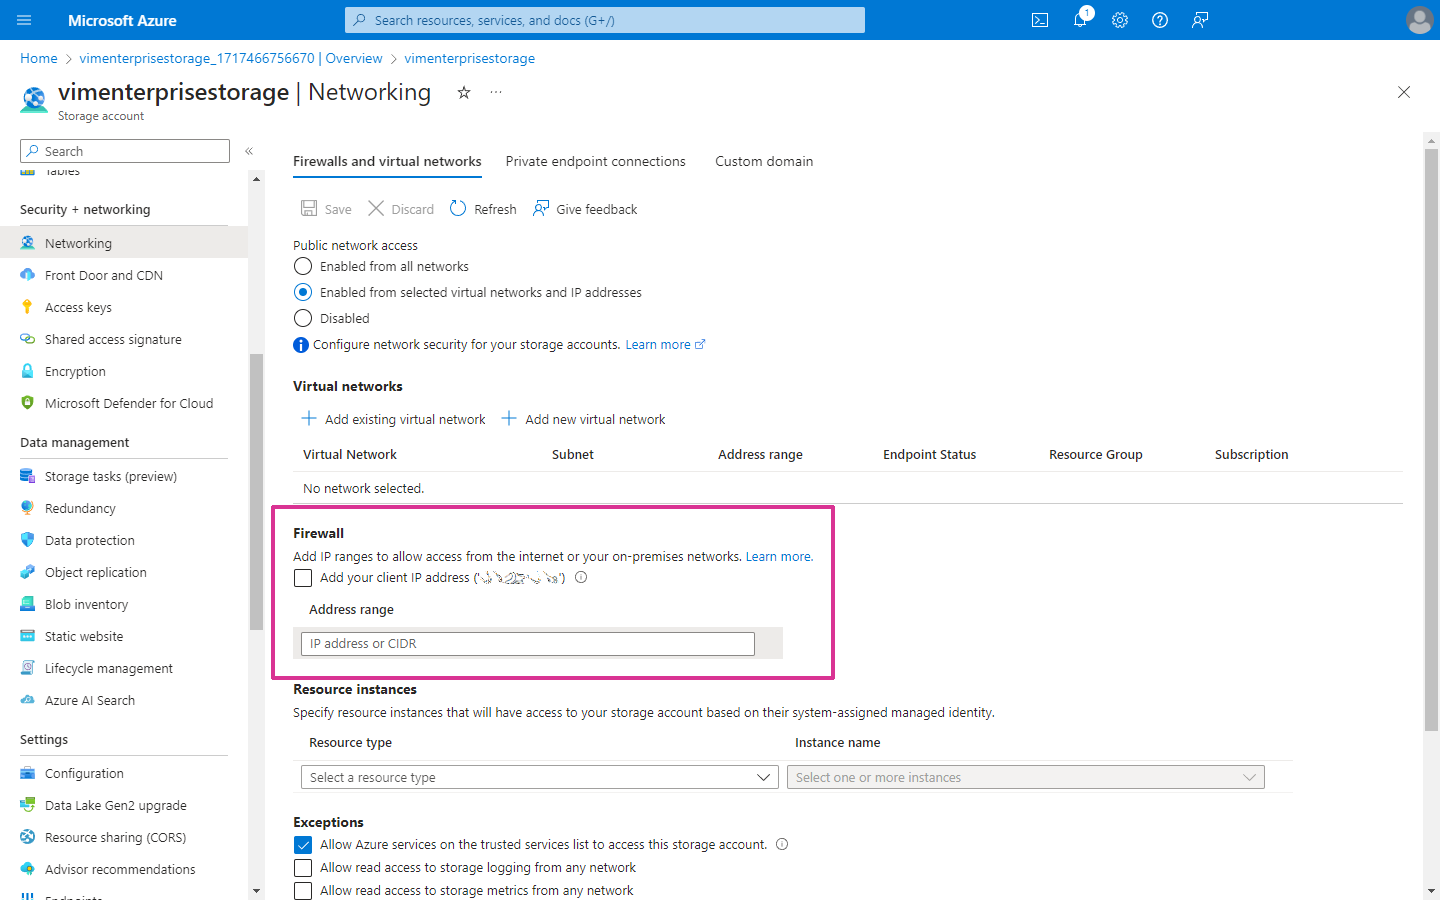
- On the Storage account Networking page, under Firewall, type your IP address in the Address range field, and click Save. You can add additional IP addresses if you want to share your Power BI reports.
Configuring Resource Sharing (CORS)
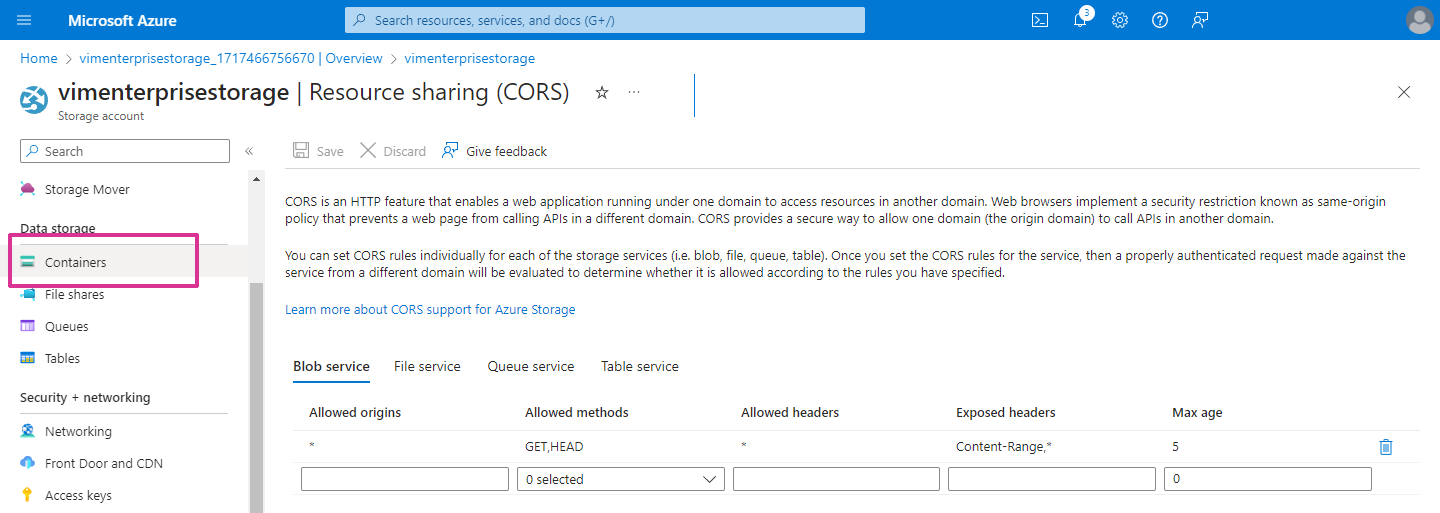
- On the Storage account page, in the left panel under Settings, click on Resource sharing (CORS).
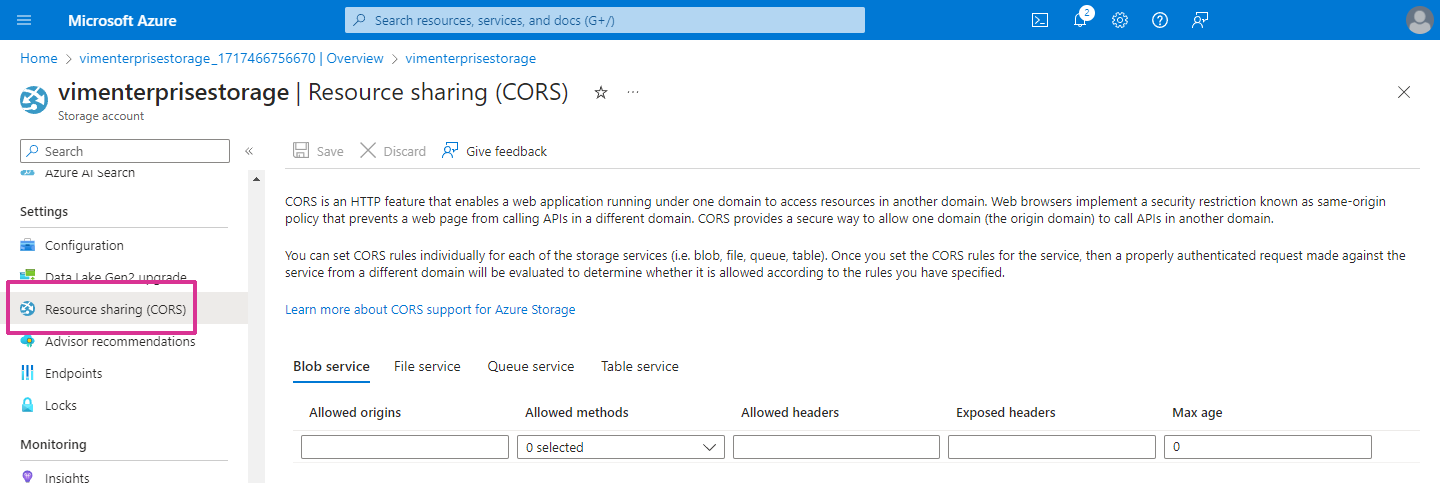
- On the Resource sharing (CORS) page, define the settings below. For more information, refer to the Microsoft Online Help for Azure Resource sharing.
- Allowed origins - type
* - Allowed methods - click the drop-down menu and enable GET and HEAD
- Allowed headers - type
* - Exposed headers - type
Content-Range,* - Max age - type
5
- Allowed origins - type
- Click Save. A "Successfully saved CORS rules" message will appear when the configuration has been saved.
Creating a Container
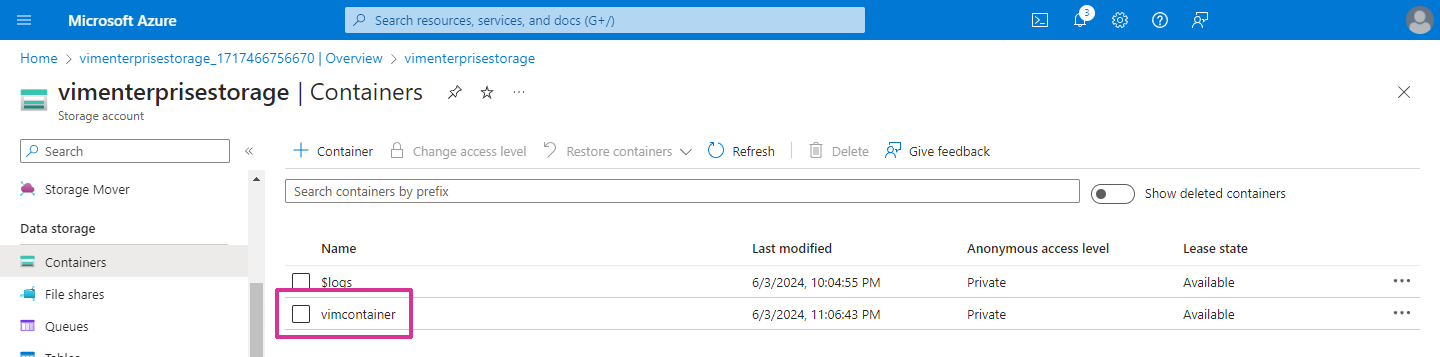
- On the Storage account page, in the left panel under Data storage, click on Containers.
- On the Containers page, click Container.

- In the New container panel, type a container Name.
- At the bottom of the New Container panel, click Create. A "Successfully created storage container" message will appear when the container has been created, and the container is listed on the Containers page.
- In the containers list, click on the name of the container you just created.
Creating Shared Access Tokens
- On the Container page, in the left panel under Settings, click Shared access tokens.

- On the Shared access tokens page, click the Permissions drop-down menu and enable Read, Add, Create, Write, Delete, and List.
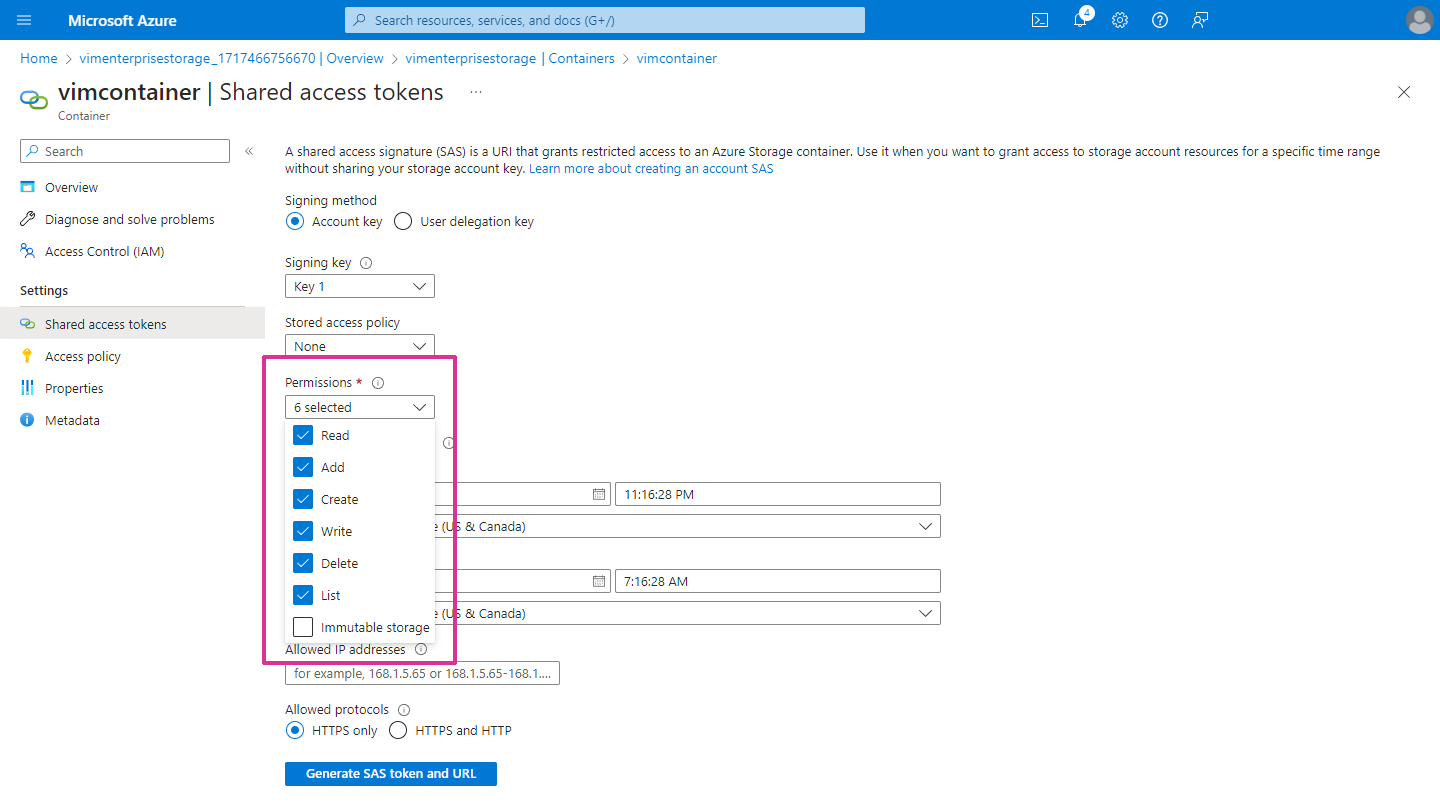
- Define the Start and Expiry dates and time zones as required.
- Click Generate SAS token and URL. The Blob SAS token and Blob SAS URL fields are displayed at the bottom of the Container page.
- Click the Copy icon on the right side of the Blob SAS URL field. This string is required for the VIM Enterprise project settings. You can save this string to a text file or you can paste it directly into your VIM Enterprise project settings.

Creating an Azure SQL Database
To create an Azure SQL database, you must have access to a Microsoft Azure Resource group. The same Resource Group can be used for the Azure SQL database and the Azure Storage Account. The Resource group acts as a container for the various resources required to create and manage SQL databases. You must also have sufficient privileges in Microsoft Azure to create additional resources.
The following Azure resources are required for an SQL database:
- SQL Server — manages the SQL databases and the network access controls
- SQL Elastic pool — enables resource sharing between multiple databases that require resources at different times. A separate database is required for each VIM Enterprise project, but the same elastic pool can be used for all of your databases.
- Database Firewall — controls who can access the databases
- SQL database — stores the VIM Enterprise project BIM data (excluding the 3D geometry data, which is stored in the VIM file).
A separate database is required for each VIM Enterprise project. It's a good idea to name each database based on the corresponding VIM Enterprise project. Each VIM Enterprise project will require the corresponding SQL database connection string.
If you are not familiar with Microsoft Azure, contact your IT department for assistance or have them complete this procedure for you.
If you want to create a local SQL Server database, see Creating a Local SQL database.
Creating an Azure SQL Server
- Log in to Microsoft Azure and go to your Resource group Home page.
- On the Resource group page, click Create.
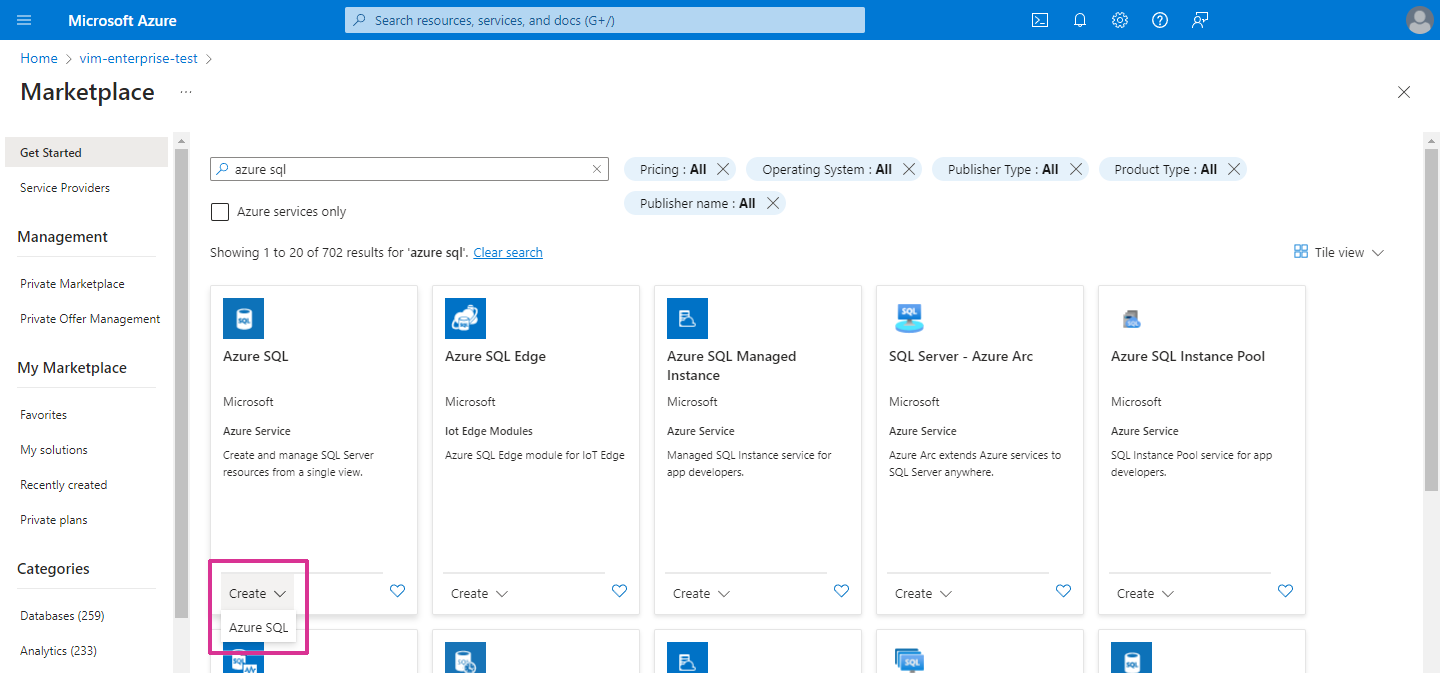
- On the Marketplace page type
Azure SQLin the search field and press Enter. - From the search results list, under Azure SQL, click the Create drop-down and choose Azure SQL.
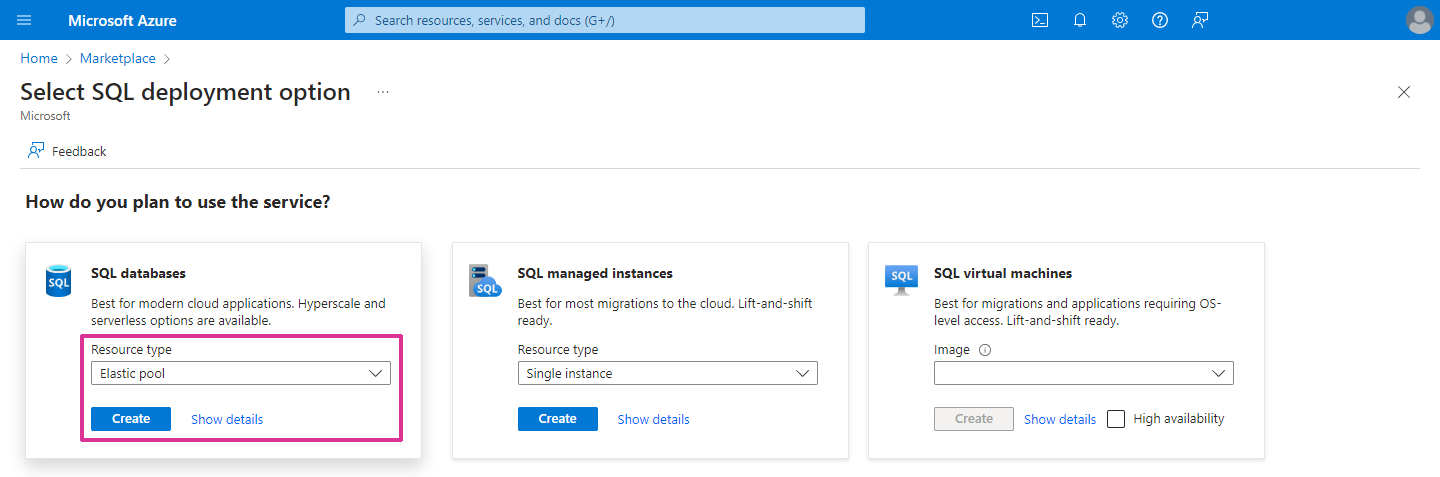
- On the Select SQL deployment option page, in the SQL databases box, click the Resource type field, choose Elastic pool from the drop-down list, and click Create.
Creating an SQL Elastic Pool
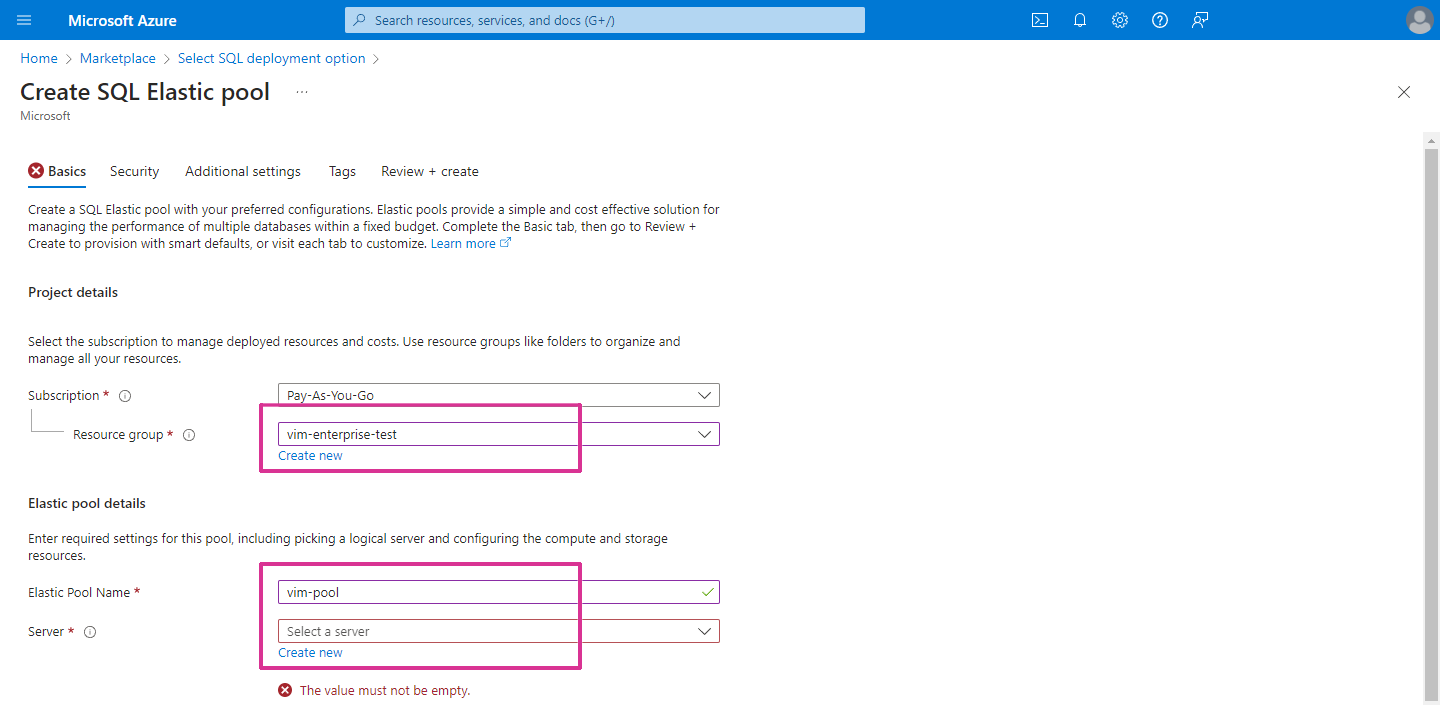
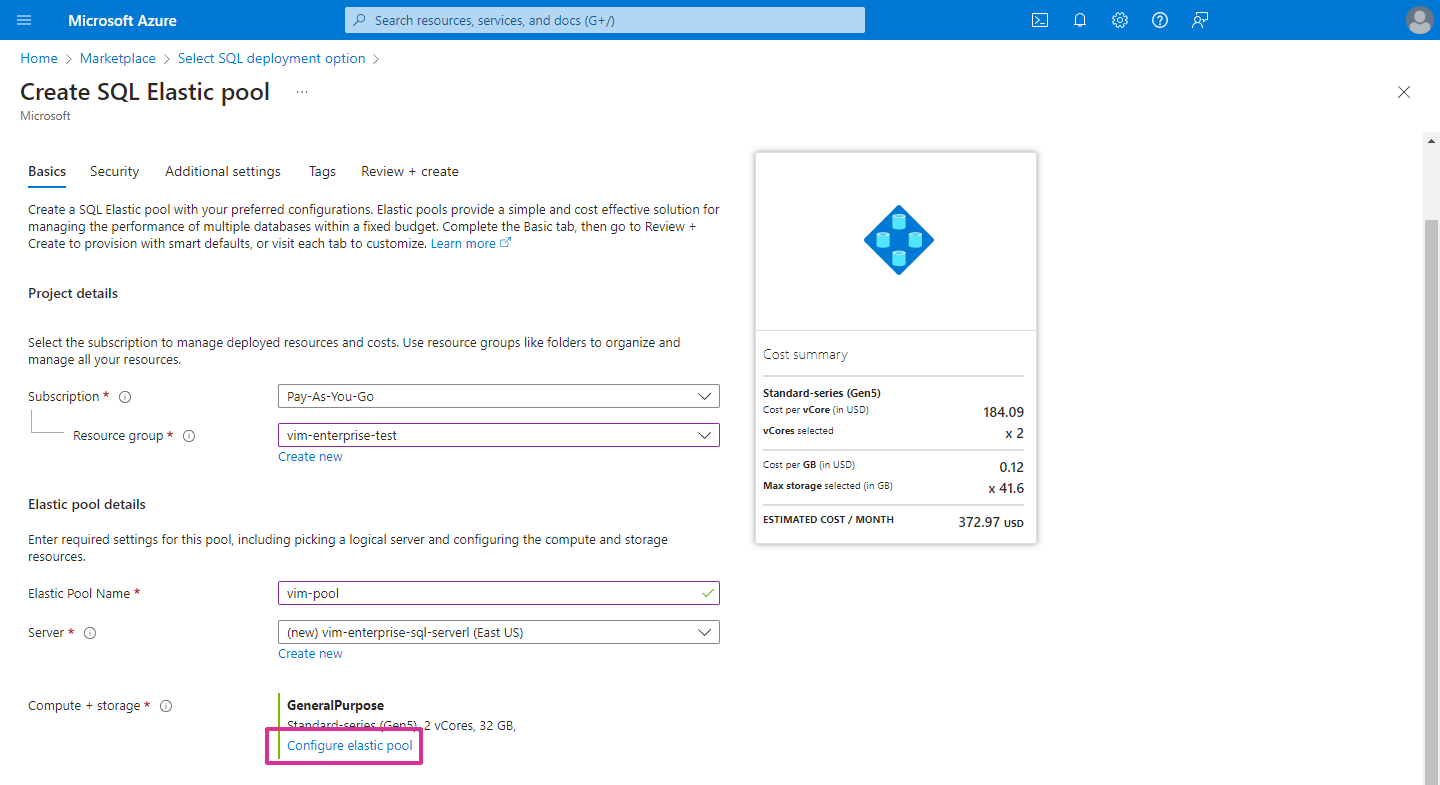
- On the Create SQL Elastic pool page, make sure the correct Resource group is selected (see below).
- In the Elastic pool details section, type a name in the Elastic Pool Name field.
- Below the Server field, click Create new.
- On the Create SQL Database Server page, under Server details, type a name in the Server name field.
- For the Authentication method, select Use SQL authentication, then specify a Server admin login and Password. Make a record of the password. It will be required when you create a VIM Enterprise project.
NOTE: VIM Enterprise currently supports only SQL authentication.
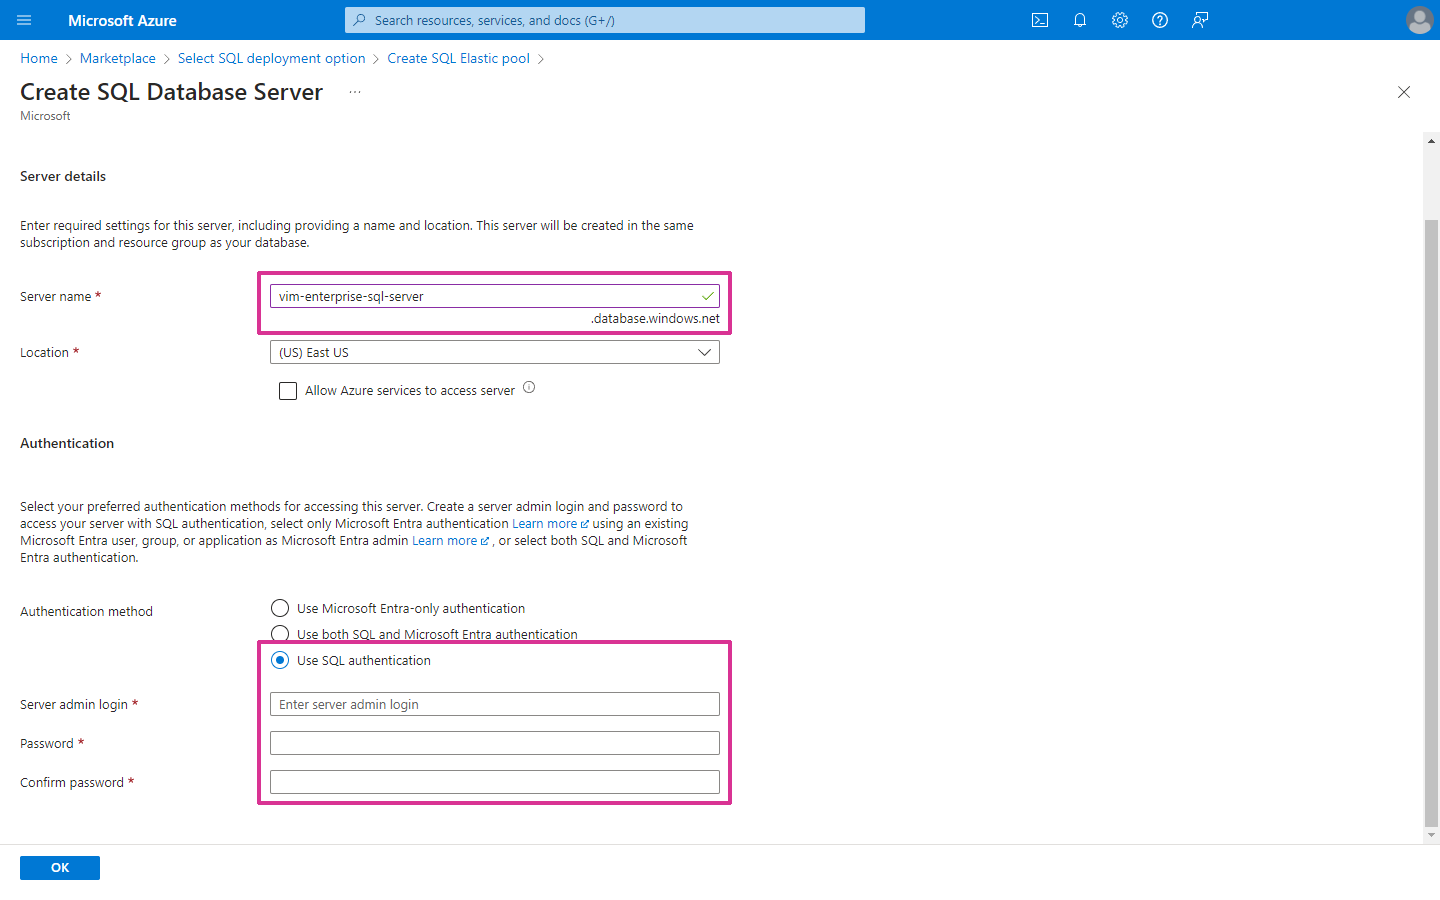
- Click OK.
- On the Create SQL elastic pool page, in the Elastic pool details section, click Configure elastic pool.
- On the Configure page, in the Service and computer tier section, click the Service tier drop-down list and select an option that suits your requirements. For smaller Revit projects the Basic or Standard options should be sufficient. If you are working with larger and more complex projects, choose the option that suits your requirements.
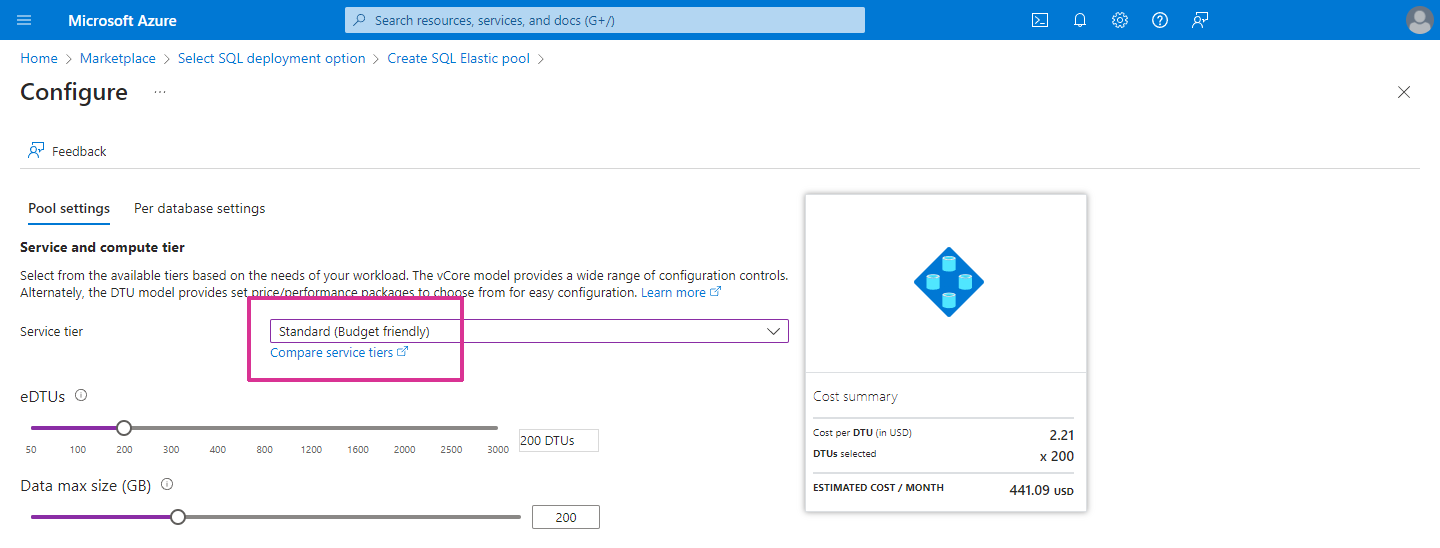
- At the bottom of the Configure page, click Apply.
- On the Create SQL Elastic pool page, review the settings on the other tabs (Security, Additional settings, Tags), and modify the settings based on your IT policies if required.
- Click Review + create, review your settings, and then click Create.
Configuring a Database Firewall
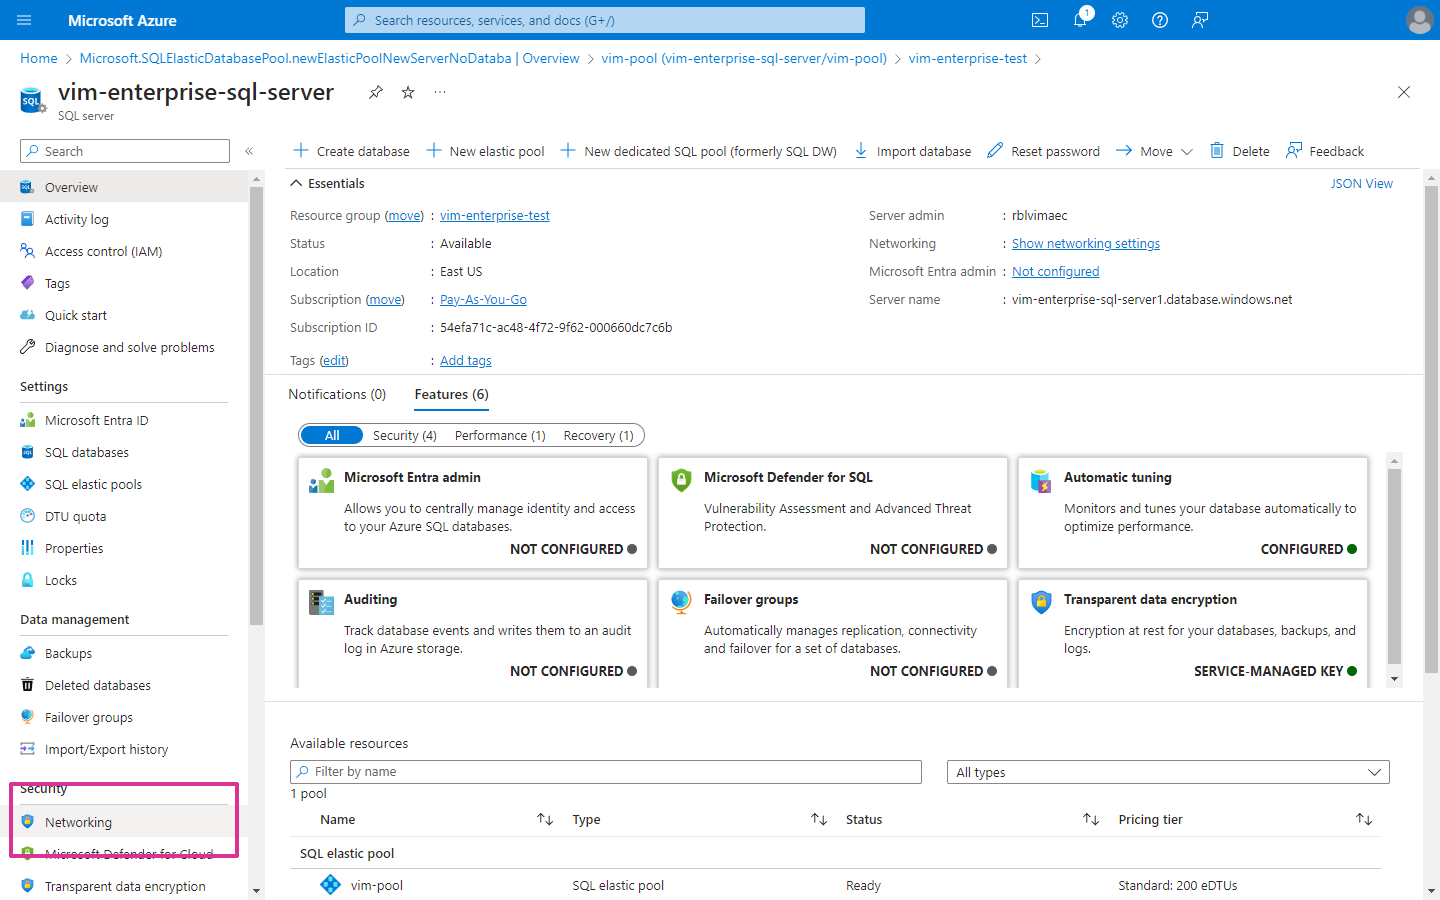
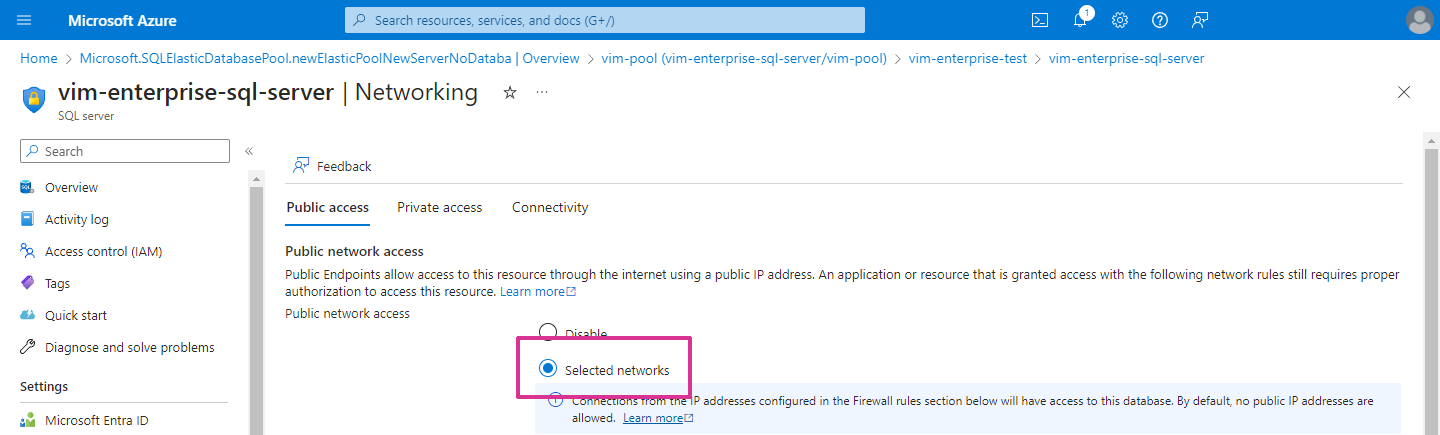
- On the SQL server page, in the left panel under Security, click on Networking.
- On the SQL server Networking page, enable the Selected networks option, and confiigure the firewall rules based on your IT policies.
Creating an Azure SQL Database
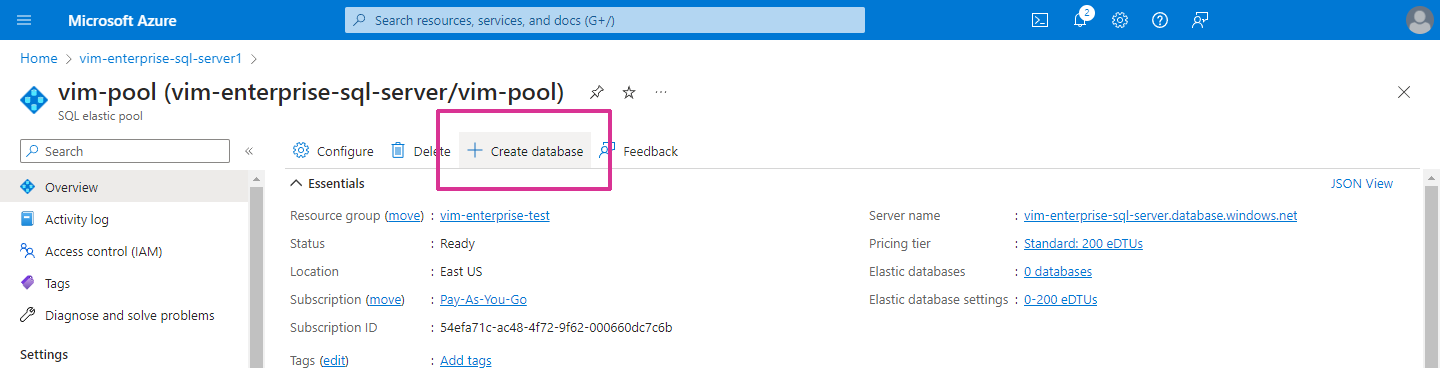
- On the SQL Server page, click on the SQL elastic pool.
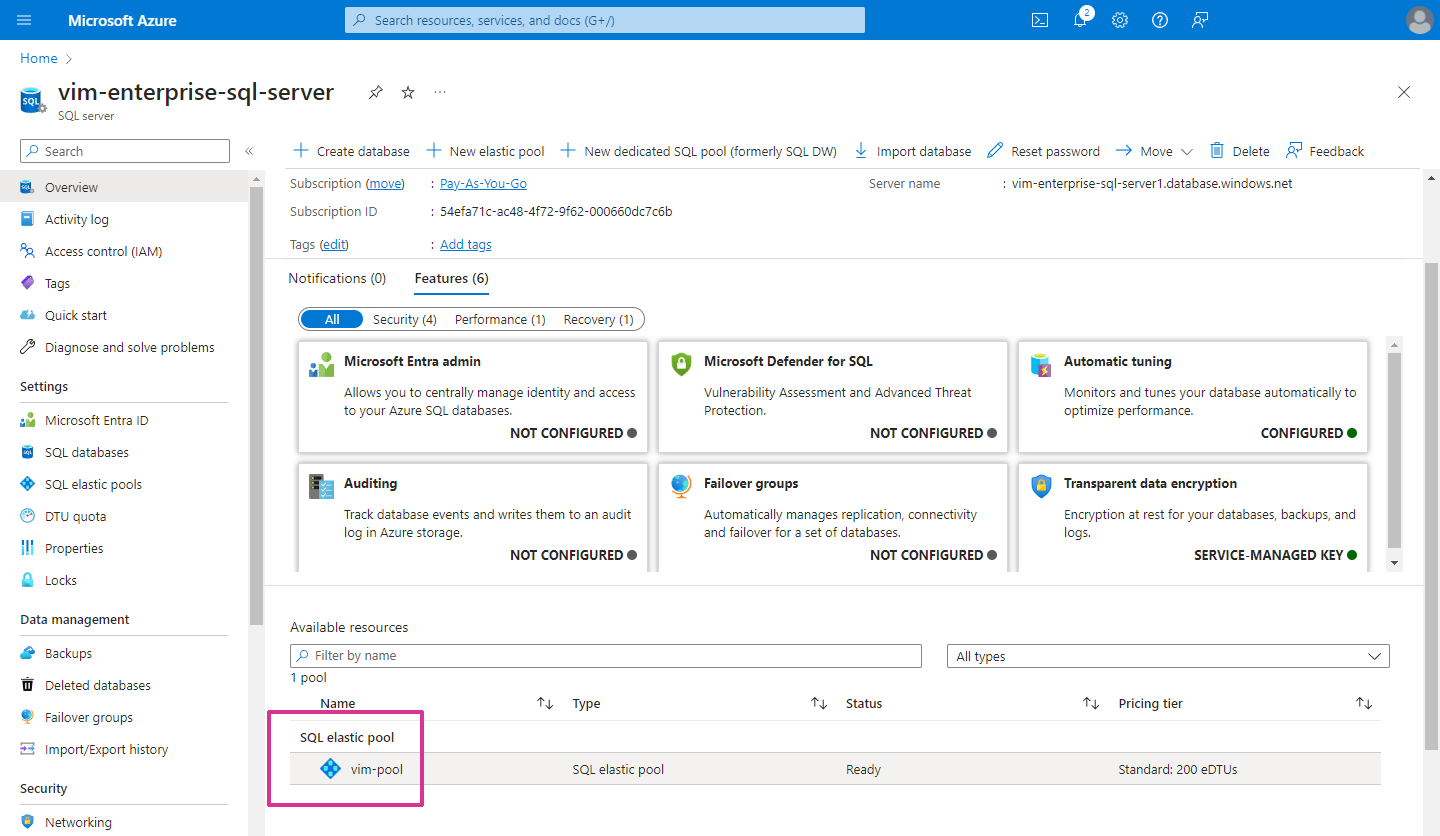
- On the SQL elastic pool page, click Create database.
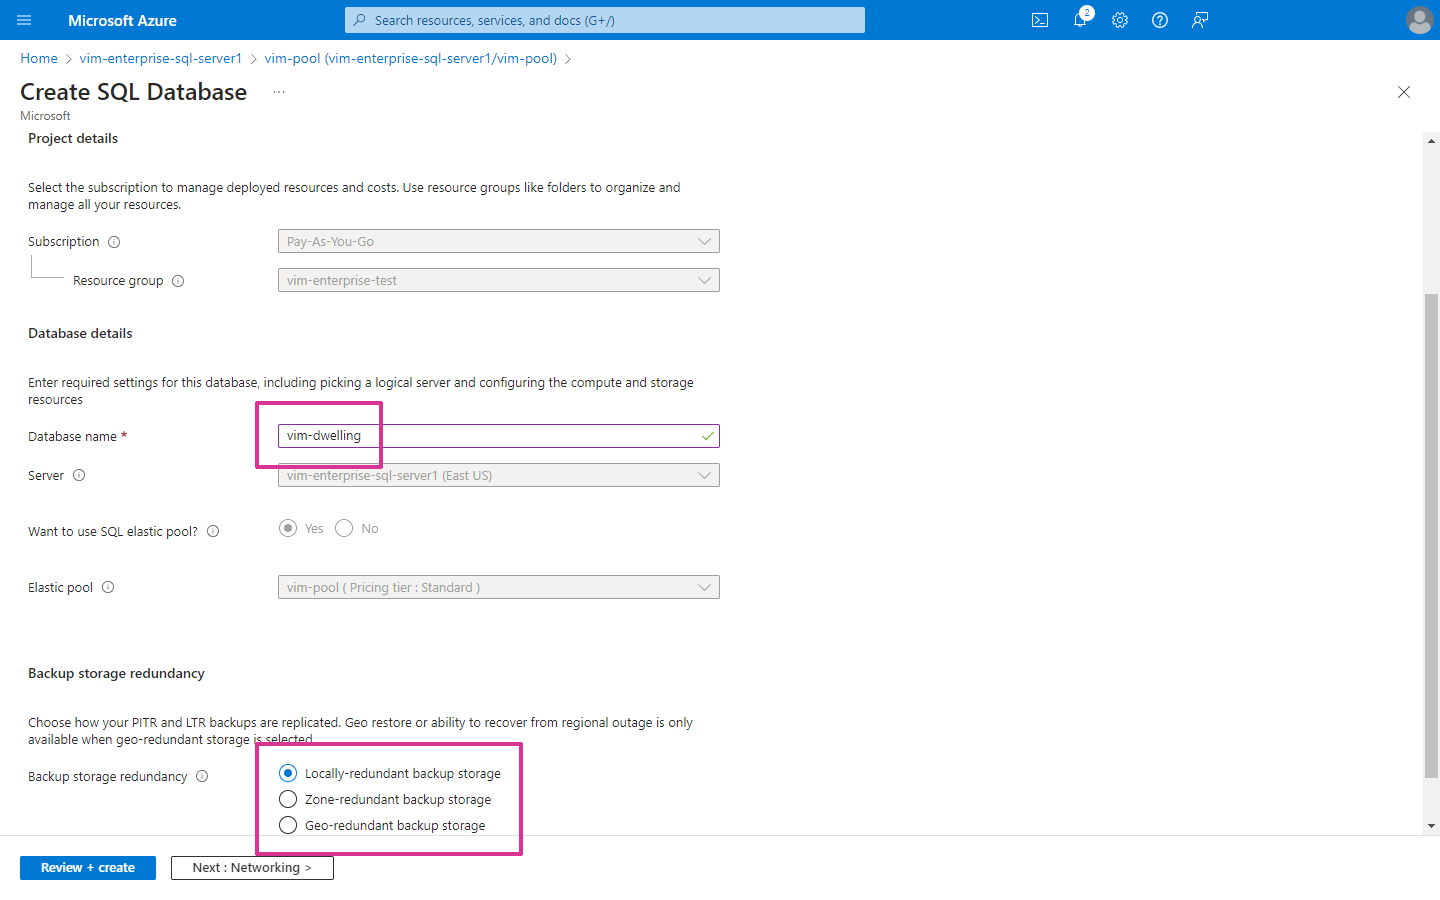
- On the Create SQL database page, type a Database name and select a Backup storage redundancy option. It's a good idea to name the database based on the corresponding VIM Enterprise project.
- On the Create SQL database page, review the settings on the other tabs (Networking, Security, Additional settings, Tags), and modify the settings based on your IT policies if required.
- On the Create SQL database page, click Review + create, review your settings, and then click Create.
- When the deployment is complete, on the Deployment page, click Go to resource.
- On the SQL Database page, in the left panel under Settings, click Connection Strings.

- On the SQL database Connection strings page, in the ADO.NET (SQL authentication) field, click the Copy to clipboard icon in the lower right corner. You need to add this database connection string to the VIM Enterprise project settings, but you must first update the
{your_password}placeholder (underlined text below).
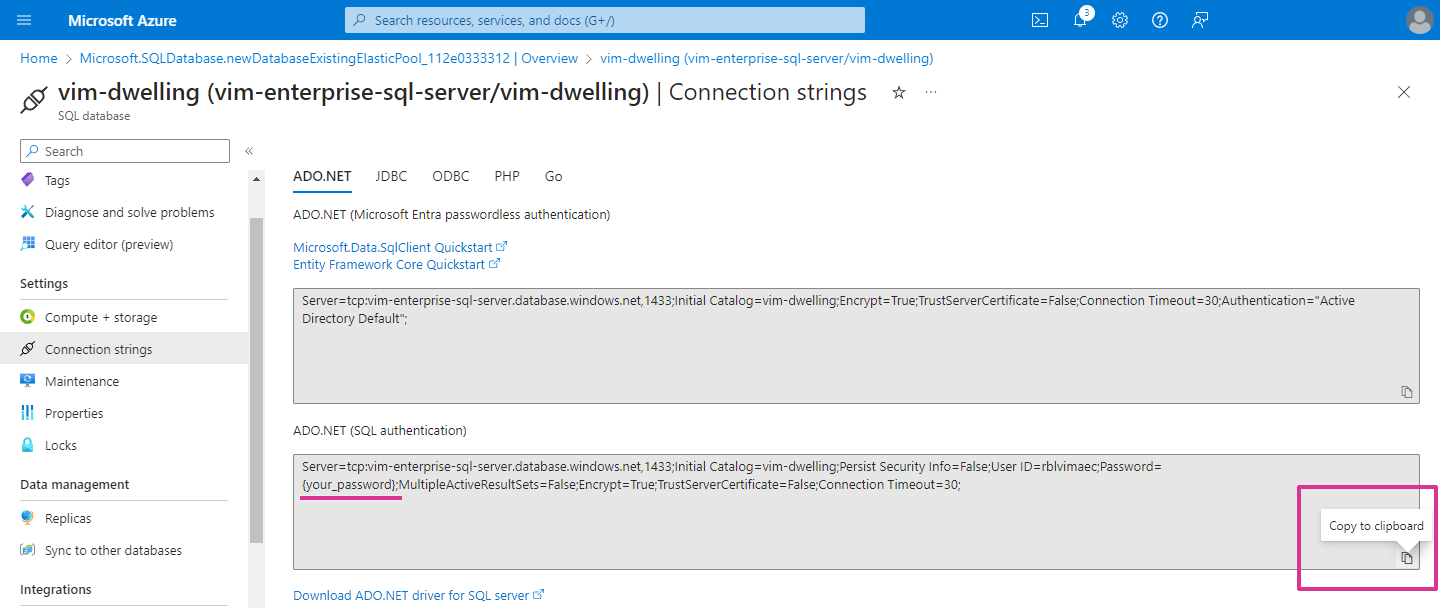
- Paste the text copied from the SQL database Connection strings page into a text editor, replace
{your_password}with the Server admin password you defined in Creating an SQL Elastic Pool. - Copy or save the modified text string so that it can be pasted into the VIM Enterprise project settings.
A separate database is required for each VIM Enterprise project. To create additional databases, you only need to repeat the steps in this last section (Creating an Azure SQL Database).
Creating a Local SQL Database
Prerequisites
To use VIM Enterprise with a local SQL Server database, you will need to install the following software:
- SQL Server 2022 Express (direct download link)
- Microsoft SQL Server Management Studio (direct download link)
A separate database is required for each VIM Enterprise project. It's a good idea to name each database based on the corresponding VIM Enterprise project.
Each VIM Enterprise project will require the corresponding SQL database connection string, which includes the database name.
NOTE: If you are using a local SQL database and intend to have peers update Power BI reports, then they will also require access to the database.
If you want to create an Azure SQL database, see Creating an Azure SQL database.
Installing the SQL Server Software
Download the software using the links provided above.
- To install SQL Server 2022 Express, double-click on SQL2022-SSEI-Expr.exe. When prompted, choose the Basic installation.
- To install Microsoft SQL Server Management Studio, double-click on SSMS-Setup-ENU.exe.
Connecting to the SQL Server
- Click the Windows Start menu, go to Microsoft SQL Server Tools 20, and click SQL Server Management Studio 20.
- In the Connect to Server dialog, click the Server type drop-down menu and choose Database Engine.
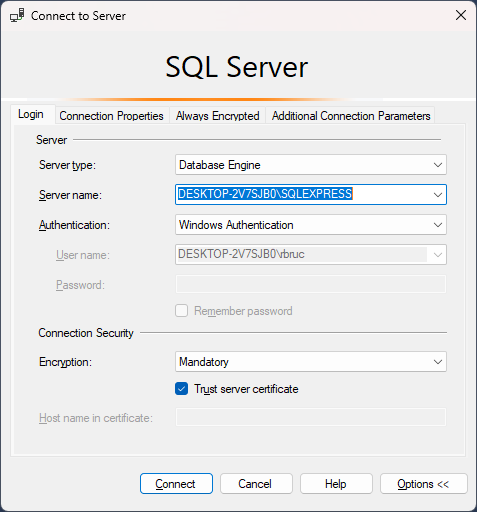
- Click the Server name drop-down menu and choose the locally running SQL Server (<computer_name>\SQLEXPRESS).
- Click the Authentication drop-down list and choose Windows authentication.
- Click the Encryption drop-down menu, choose Mandatory, and enable the Trust server certificate option.
- Click Connect.
Creating an SQL Server Database
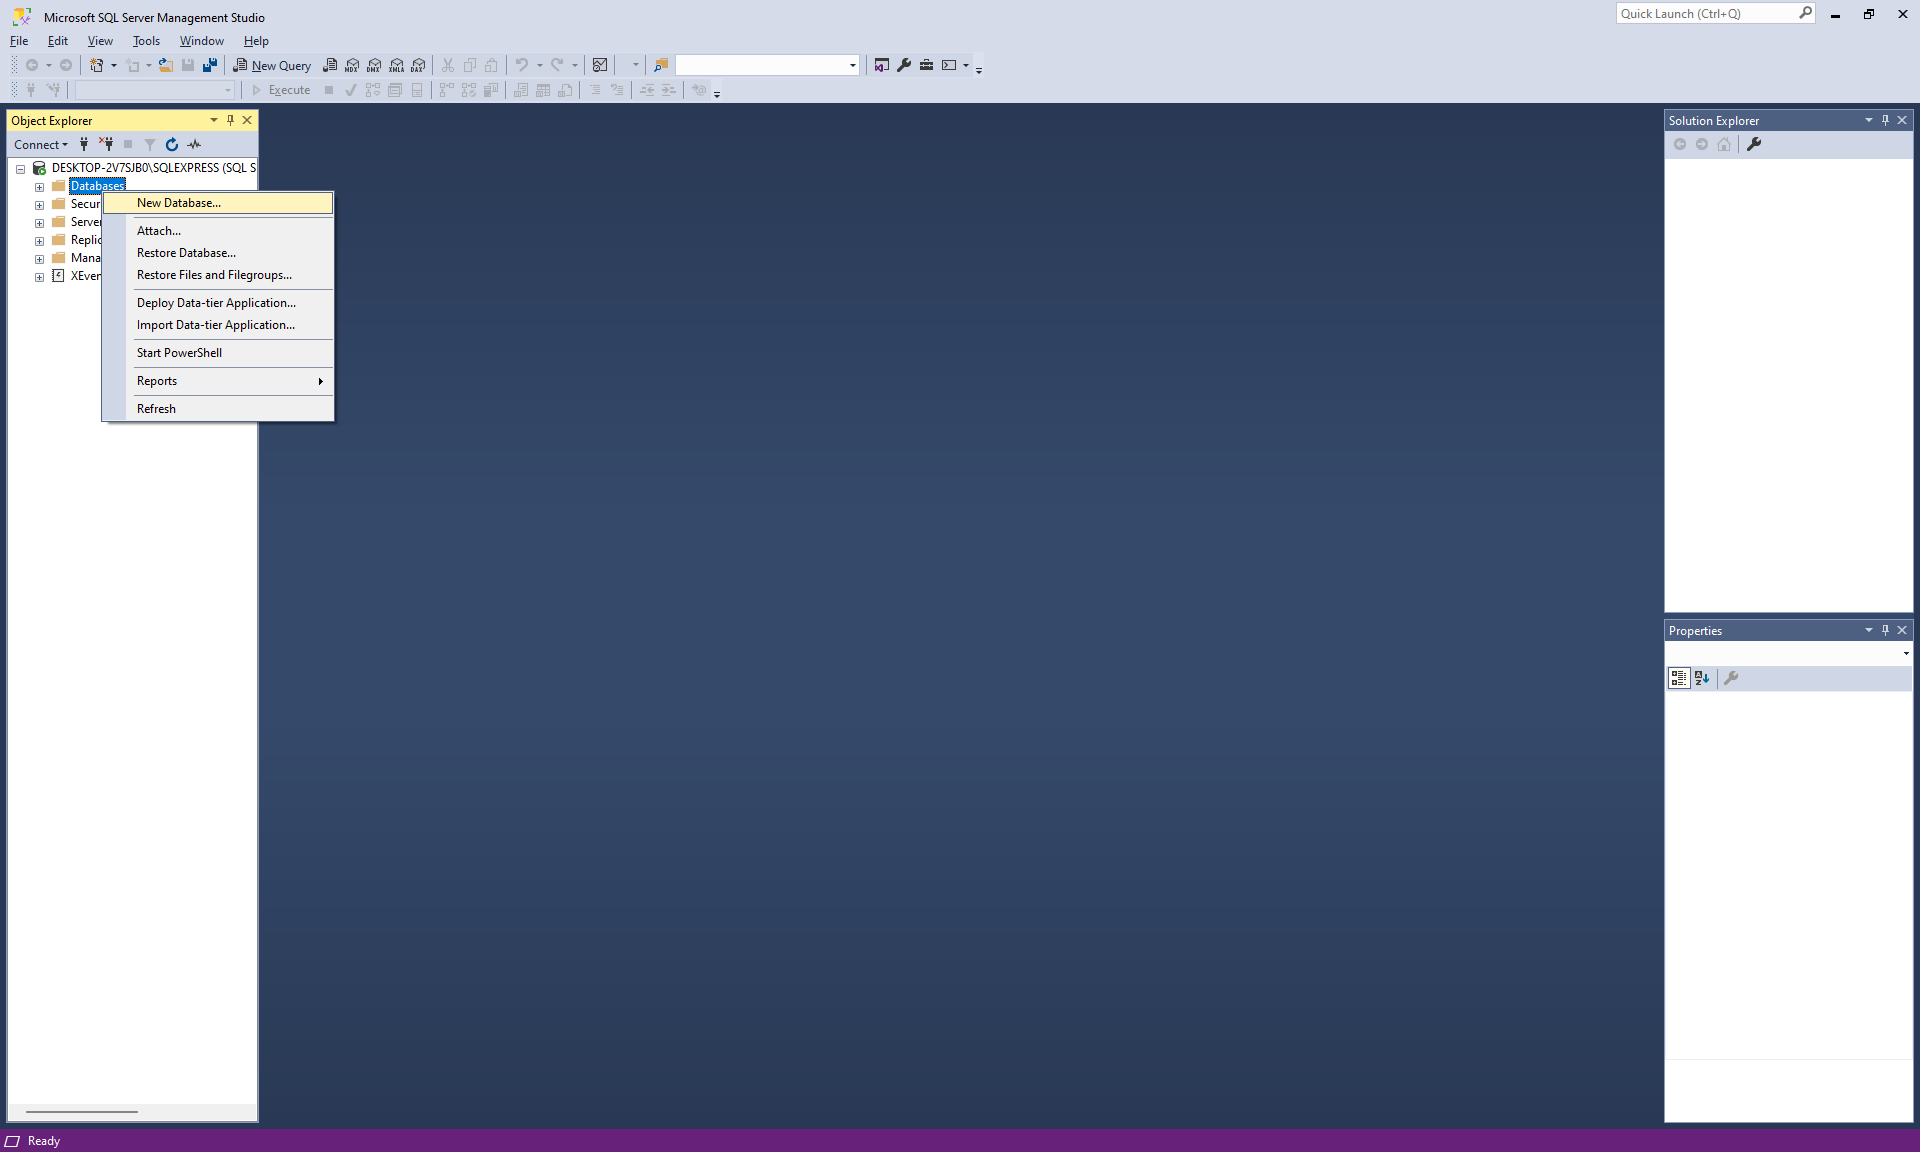
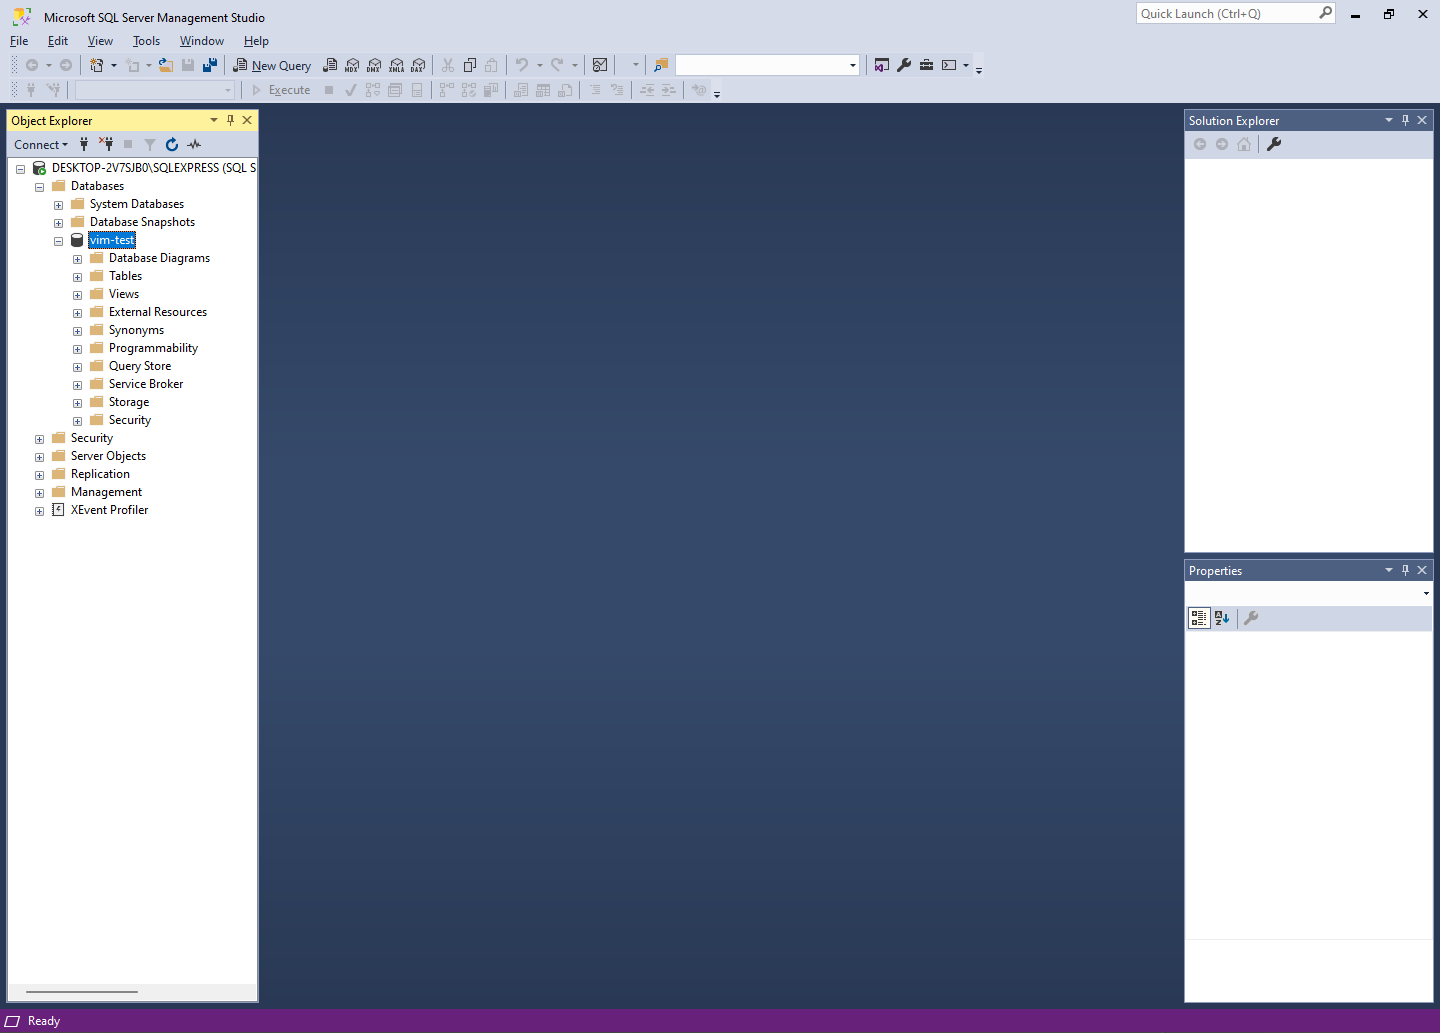
- In the Object Explorer, right-click on Databases and choose New database.
- In the New Database dialog, type a Database name and click OK.
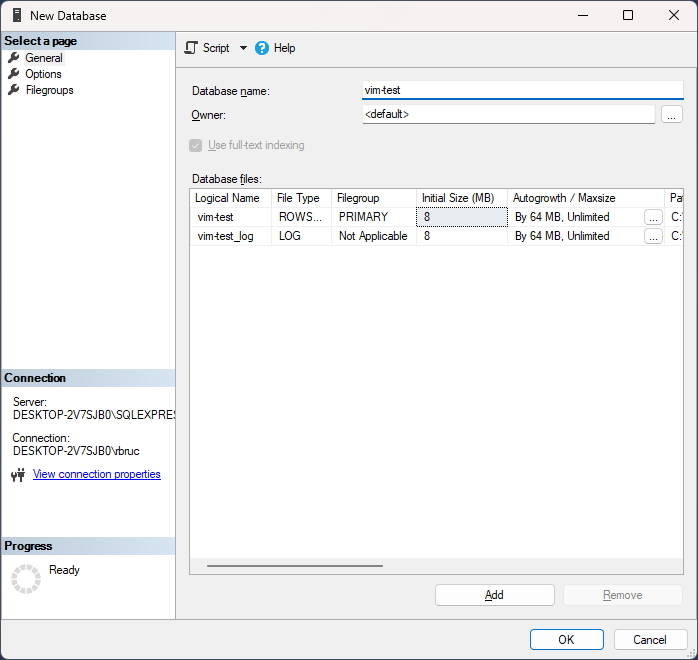 The new database will be listed in the Object Explorer under the Databases list.
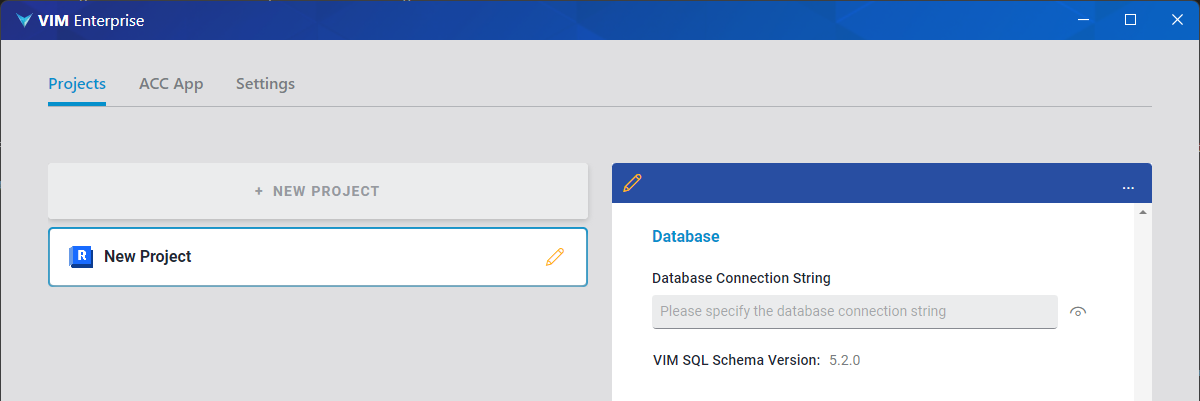
When you create a VIM Enterprise project, you will need the database connection string to your local SQL database. Copy the database string below, but replace __db_name__ with the name of the database you will be using in your VIM Enterprise project.
Data Source=localhost\SQLEXPRESS;Initial Catalog=__db_name__;Integrated Security=SSPI;TrustServerCertificate=True;
A separate database is required for each VIM Enterprise project. To create additional SQL Server databases, you only need to repeat the steps in this last section (Creating an SQL Server Database).
Configuring ACC
This procedure is only required if you are using Autodesk Construction Cloud (ACC) as a project source for VIM Enterprise.
To connect VIM Enterprise to ACC, you will need to create an ACC application and then add it as a custom integration in your ACC account. The same ACC application can be used for multiple projects and multiple users. To create an ACC application, you must have Account Administrator privileges with your ACC organization. These procedures are typically performed by your IT department or your ACC administrator.
NOTE: VIM Enterprise uses Autodesk's Design Automation services, so you will need Autodesk Flex Tokens to use VIM Enterprise with ACC.
Step 1: Create an ACC Application
- Log on to Autodesk Platform Services and click on Go to my apps.
- On the Applications page, click Create application.
- In the Create Application dialog, type a Name for your application, select Traditional Web App, and click Create.
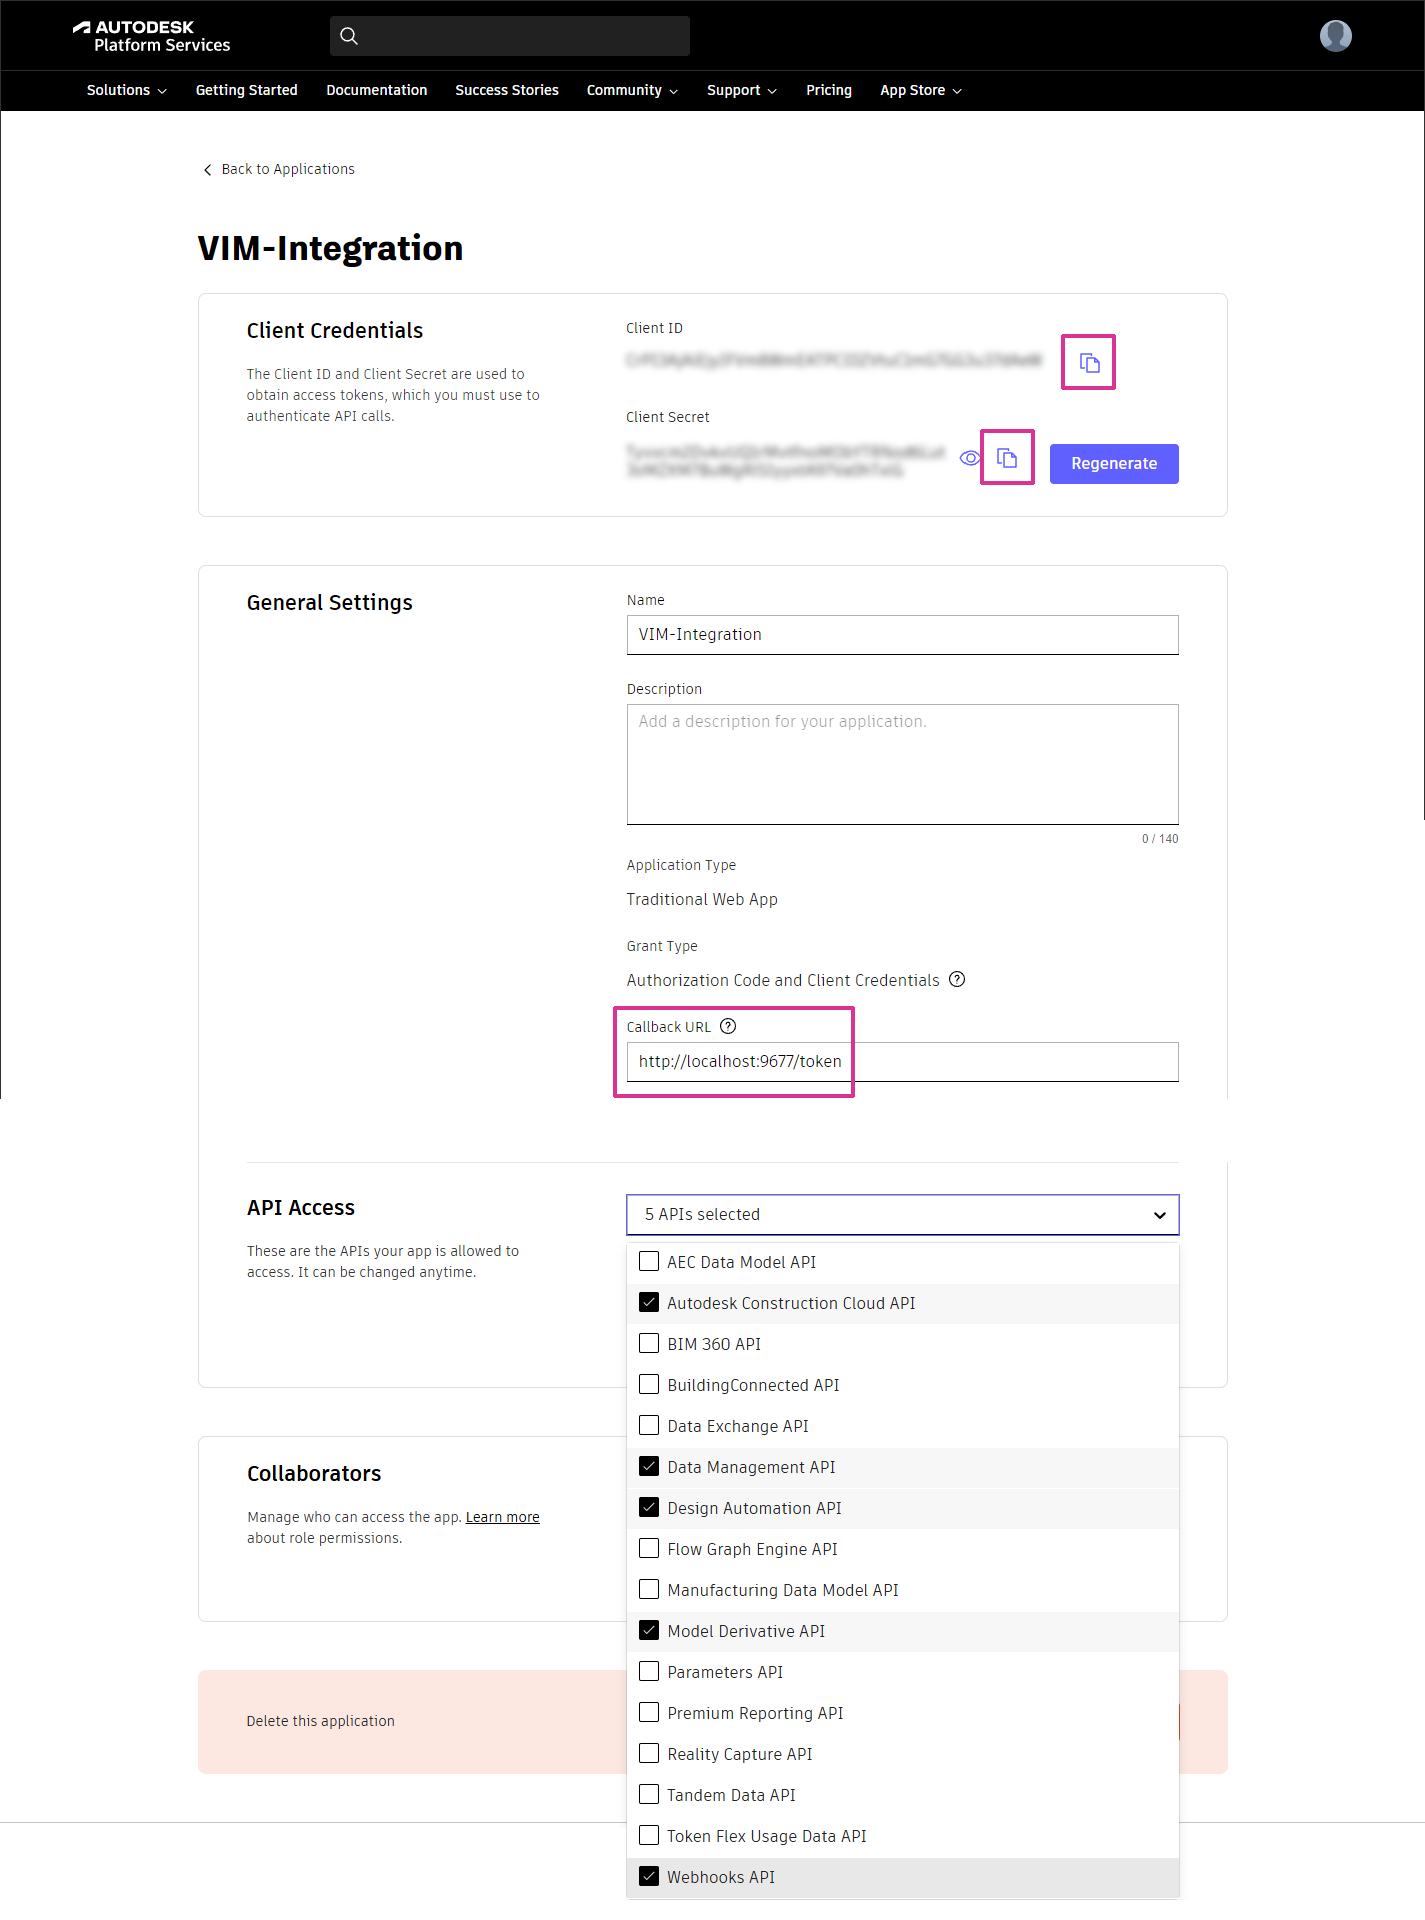
- On the application page, under General Settings, type
http://localhost:9677/tokenin the Callback URL field. This URL is used as part of the authentication process with VIM Enterprise. - In the API Access section, click the drop-down list and enable the following APIs:
- Autodesk Construction Cloud API
- Data Management API
- Design Automation API
- Model Derivative API
- Webhooks API
- Click Save changes.
- Leave this web page open or copy each of the fields below and save them in a text document. You will need the Client ID for the procedure Step 2: Add the ACC app as a custom integration (below). You will need the fields below for the procedure Step 3: Configure the ACC App.
- Client ID
- Client Secret
- Callback/Redirect URL
Step 2: Add the ACC Application as a custom integration
- Log on to Autodesk Construction Cloud.
- On the ACC welcome page, click on Account Admin in the top-left corner.
- In the left panel, click on Custom Integrations.
- On the Custom integrations page, click on Add custom integration.
- Get the Client ID from the procedure above, Step 1: Create an ACC Application and paste it into the Autodesk Platform Services Client ID field in the Add custom integration dialog.
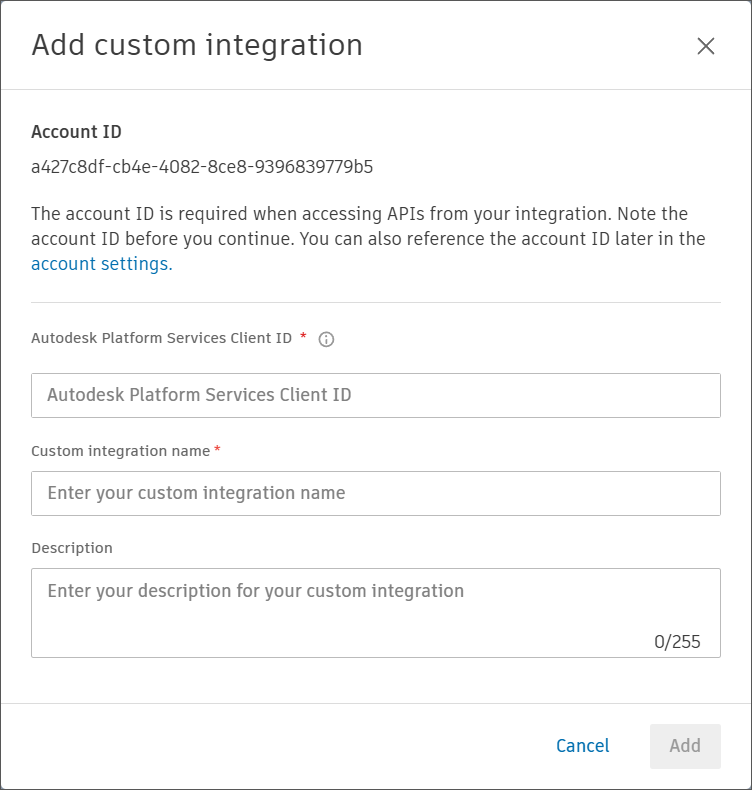
- Type a name in the Custom integration name field, and add a Description if desired.
- At the bottom of the Add custom integration dialog and click Add. A message appears saying the app has been added.
Step 3: Configure the ACC App
The ACC connection settings are on the ACC App panel in VIM Enterprise and only need to be configured once.
- In VIM Enterprise, go to the ACC App panel and click ACC APP SETUP.
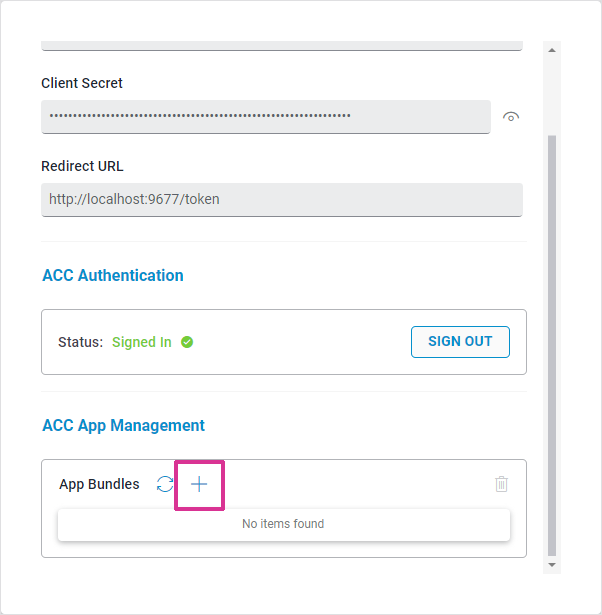
- Obtain the connection settings required for VIM Enterprise to connect to Autodesk Construction Cloud. The Client ID, Client Secret, and Callback/Redirect URL are required to configure the ACC App in VIM Enterprise.
- If your IT department or ACC administrator configured the ACC application, you will need to contact them to get the connection settings.
- If you configured the ACC application, in a web browser, go to Autodesk Platform Services, click on Go to my apps, and then click on the application you created in Step 1: Creating an ACC Application.
- Paste the Autodesk Construction Cloud connection settings into corresponding fields on the VIM Enterprise ACC App Credentials panel.
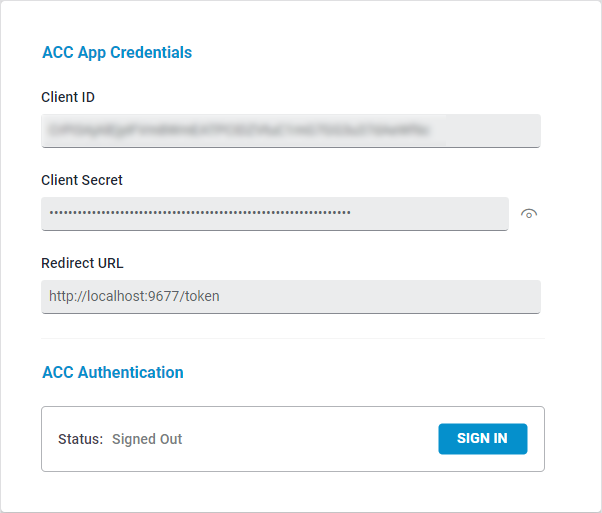
- Click Save and then click on Sign In.
- When prompted to authorize the ACC application, click Allow. This authorization provides secure access to your ACC Revit projects.
- When the sign in to ACC is complete, on the VIM Enterprise ACC App panel, under ACC App Management, click on the "+" icon beside App Bundles to upload the app bundle specific to your version of Revit (e.g., Revit 2024). An app bundle contains the VIM Revit add-ins required to run on the Autodesk Construction Cloud platform. You must upload an app bundle for each version of Revit you will be using. App bundle archives for all of the supported Revit versions are included with the VIM Enterprise installation.
- In the New ACC App Bundle dialog, type a Name.
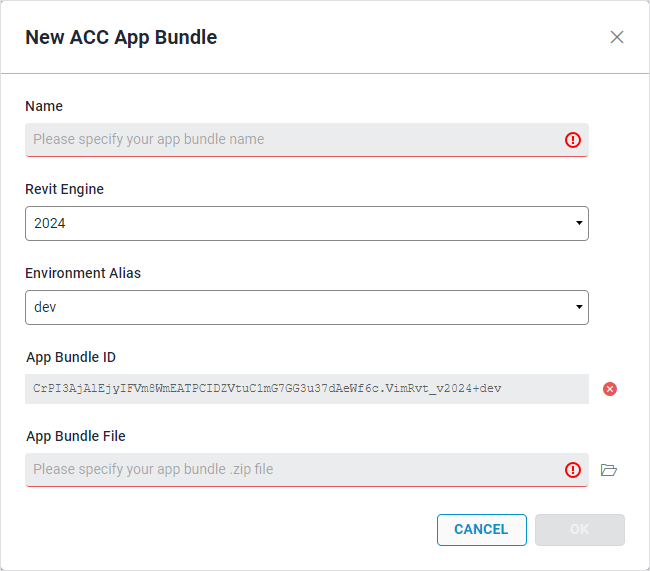
- Click the Revit Engine drop-down menu and select the Revit version for the app bundle.
- Click the Environment Alias drop-down list and choose an alias. The Environment Alias allows you to apply different tags to your App bundles in case you are developing your own apps using the VIM SDK.
- Click the folder icon beside the App Bundle File field.
- In the Choose App Bundle dialog, select the archive that corresponds to your version of Revit, click Open, and then click OK. The App Bundle is added to the item list.
Updating App Bundles
App Bundles are updated periodically with improvements and bug fixes, and need to be replaced on the ACC site. Updates to App Bundles are indicated in the Release Notes.
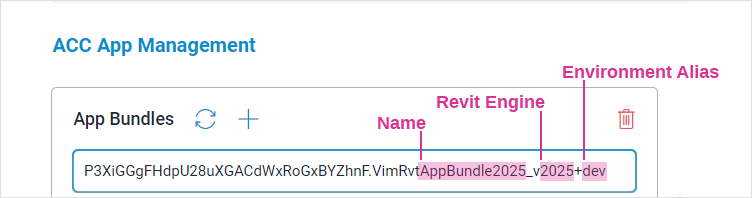
NOTE: Before updating an App Bundle, make a note of the current App Bundle Name, Revit Engine, and Environment Alias under ACC App Management on the ACC App panel in VIM Enterprise (see the highlighted example below).
- Select the App Bundle you want to replace and click the Delete (trash) icon at the top-right of the App Bundles section. The App Bundle is removed from the item list.
- Click the "+" icon beside App Bundles.
- In the New ACC App Bundle dialog, type the same Name that was used previously.
- Click the Revit Engine drop-down menu and select the same Revit version that was used previously.
- Click the Environment Alias drop-down list and select the same alias that was used previously.
- Click the folder icon beside the App Bundle File field.
- In the Choose App Bundle dialog, select the archive that corresponds to your version of Revit, click Open, and then click OK. The App Bundle is added to the item list.
Related Topics
Creating a Project using ACC
Creating a Project using Revit
Creating a Project using IFC