Getting Started with VIM Cloud
VIM Cloud lets you generate customized BIM reports with Microsoft Power BI.
The latest version of VIM Cloud is currently in preview release mode
1. Sign up to VIM Cloud
You will first need to create a VIM Cloud user account: https://app.vimaec.com/signup.
2. Choose a Plan
Next, you will need to choose a plan to create your organization. If this is your first organization, we offer a trial period in which you can evaluate the service.
3. Create a Project
Once you've created your organization, go to the Projects tab and press the "+ New Project" button. Projects in VIM Cloud are used to convert your BIM model into Power BI reports.
-
The Manual project type lets you upload a VIM file you have created on your machine into your project. To get started:
-
Use the VIM Revit Exporter or the VIM IFC Exporter to create your VIM file.
-
In VIM Cloud, create a new Manual project and upload your VIM file.
-
The ACC project type lets you connect to Autodesk Construction Cloud (ACC) to convert your Revit project in Autodesk's cloud services. To get started:
-
In VIM Cloud, create a new ACC project and pick your Revit project from ACC.
-
Select the Power BI report templates you want in your project. At first, you will only be able to choose from the built-in system report templates, but you can upload customized templates from the Templates tab.
-
Wait a few minutes for the the project to complete successfully
-
Click on the project report to view it in your browser!

Adding the VIM Cloud App as an ACC Custom Integration
This step is only required if you intend to use Autodesk Construction Cloud (ACC) as a project source for VIM Cloud.
To create ACC projects, you will need to add the VIM Cloud app as a custom integration.
- Log on to Autodesk Construction Cloud.
- On the ACC welcome page, click on Account Admin in the top-left corner.
- In the left panel, click on Custom Integrations.
- On the Custom integrations page, click on Add custom integration.
- In the Add custom integration dialog, in the Autodesk Platform Services Client ID field, copy and paste the following string:
LTRZYsP3ft9pQGTtHbAcBnK2imsLN6L1nm1gAAlwNH7GGBmt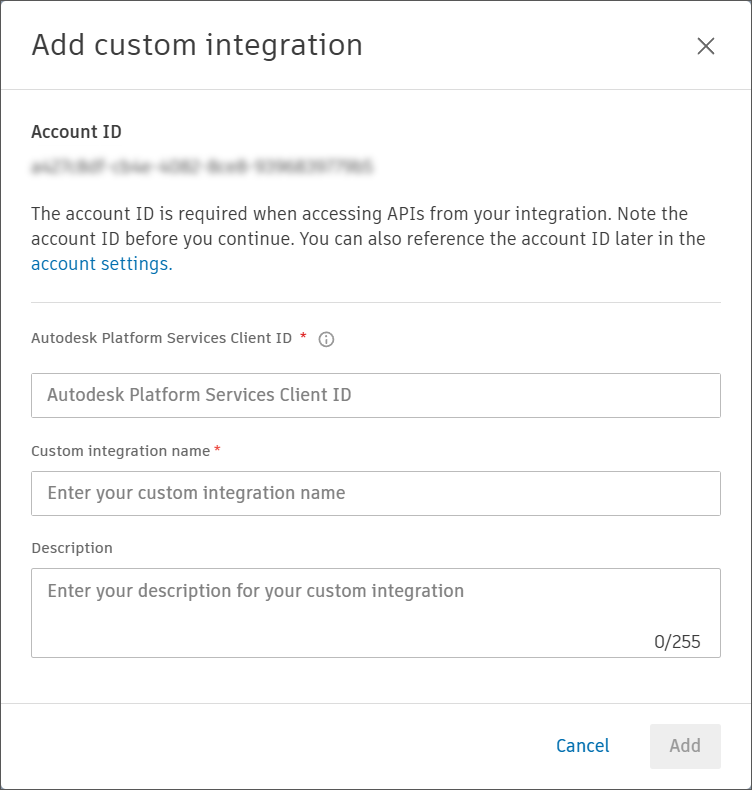
- Type a name in the Custom integration name field, and add a Description if desired.
- At the bottom of the Add custom integration dialog and click Add. A message appears saying the app has been added.